نرم افزارش رو پاک کن از روی سیستم بعد برو سایت دل تو قسمت ساپورت این نرم افزار رو دانلود کن دوباره نصب کن

 راهنمای خرید دستگاه جوجه کشی
آکوستیک ، فوم شانه تخم مرغی، صداگیر ماینر ، یونولیت
دستگاه جوجه کشی حرفه ای
فروش آنلاین لباس کودک
خرید فالوور ایرانی
خرید فالوور اینستاگرام
خرید ممبر تلگرام
[ + افزودن آگهی متنی جدید ]
راهنمای خرید دستگاه جوجه کشی
آکوستیک ، فوم شانه تخم مرغی، صداگیر ماینر ، یونولیت
دستگاه جوجه کشی حرفه ای
فروش آنلاین لباس کودک
خرید فالوور ایرانی
خرید فالوور اینستاگرام
خرید ممبر تلگرام
[ + افزودن آگهی متنی جدید ]


نرم افزارش رو پاک کن از روی سیستم بعد برو سایت دل تو قسمت ساپورت این نرم افزار رو دانلود کن دوباره نصب کن
سلام خدمت اساتید . من یه سوالی داشتم ممنون میشم که کسانی که واقعا میدونن حالا چه تجربی چه علمی جوابمو بدن ! من لپ تاپ xps L501 گرفتم یه چهار ماهی باهاش سر کردیم بعد از مدتی باطریش نابود شد و ارور replacing battery میداد تو کل تهرانم گشتم هیچ جا نبود تا اینکه یکی از دوستان از آلمان برام خریداری کرد و نزدیک به 400 هزار تومان یه باطری اورجینال 9 سلولی برام خرج برداشت ! خواهشی که دارم این هستش نحوه استفاده صحیح از باطری ، شارژ اولیه ، نگهداری و ... که میدونید رو بهم بگید چون تو هر سایت یه چیزی نوشته یکی نوشته از برق استفاده میکنید باطری روش باشه اون یکی میگه باطری رو در بیارین یکی میگه شارژ اولیه 10 ساعت اون یکی میگه 3 ساعت ، یکی میگه کالیبره یکی میگه کالیبره خودکاره و هزارتا چیزه دیگه ! خواهش میکنم به طور کامل صحیح توضیخ بدید که دوستانی هم که مشکل من رو دارن استفاده کنن . بازم از تک تک شما دوستان و اساتید ممنونم
با سلام و خسته نباشیدکمک کمکدوستان من مدل 501رو 2سالی هس ک دارم .اما به یه مشکلی برخوردم.خواهشا زود زود راهنماییم کنید.
ویندوزم بالا نمیاد و safe modeهم عمل نمیکنه.وقتی سیستم روشن میکنم 2 گزینه برام میاد با یه متن که بالاش نوشته.متنش میگه که ویندوز دچار مشکل شده ,و میگه احتمالا یه سری از فایلاش damegeشدن و یا مشکلی موقع راه اندازیش اتفاق افتاده.
برام 2 گزینه میزاره که یکیش میگه بزار repairشه و دیگری میگه start windows normaly
وقتی normaly رو میزنم جواب نمیده و موقع اومدن ویندوز سیستم دوباره reset میشه و به حالت بالا با 2گزینه در میاد.
وقتی هم repair رو میزنم یکی دو ساعتی به حال خودش گذاشتم و بازم اتفاقی نمیافته.
تازگی هام back up نگرفتم که restoreکنمش.اطلاعات و نرم افزارهای مهمی دارم توش.خواهش میکنم راهنماییم کنید.
ممنون از لطفتون.gif "N Aggressive (39)")
Last edited by amir-2012; 24-09-2012 at 19:41.

عزیزان منم این مشکلو دارم اگه کسی میدونه لطف کنه کمک کنه و راهنمایی با تشکر
عزیزان منم این مشکلو دارم اگه کسی میدونه لطف کنه کمک کنه و راهنمایی با تشکر
کسی واقعا نیست که کمک کنه
برین عوض کنین دی وی دی رامو
من عوض کردم پارسال 60 تومن خرجم شد
مدل پایونیر پرفتم عالیه الان
سلام.من هاردم باز نمیشه این ارو رامیده.Therewas a problem starting ~$WUXCZ.FAT32 The Specified module could not be found لطفا کمکم کنید این فایلو آنتی ویروس ویروس شناسایی کرد ومن هم پاکش کردم هاردمSeagate
سلام دوستان چرا گزینه wimax خاموشه و نمیشه on ش کرد؟؟؟
تصاویر زیر نحوه باز کردن سیستم جهت تعمیر یا تمیز کردن سیستم می تواند مفید باشد. در ضمن یک لینک فیلم عالی 35 دقیقه ای از آموزش باز کردن کامل سیستم و بستن سیتستم در یوتوب هست لینکش در زیر قرار داده شده است. امیدوارم مفید باشد.
[ برای مشاهده لینک ، با نام کاربری خود وارد شوید یا ثبت نام کنید ]
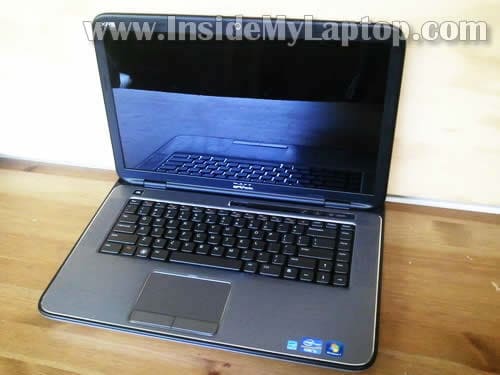
In this tutorial I explain how to disassemble a Dell XPS 15 L502X laptop. My goal is removing and replacing broken DC jack.I’ll go though the following major laptop disassembly steps:STEP 1-4: Accessing laptop memory and wireless card. Removing the DVD drive.
STEP 5–9: Disconnecting and removing the palmrest assembly.
STEP 10-12: Removing laptop hard drive.
STEP 13-17: Disconnecting and removing the keyboard.
STEP 18-21: Removing laptop screen assembly.
STEP 22-27: Removing laptop bottom cover. Accessing the cooling fan.
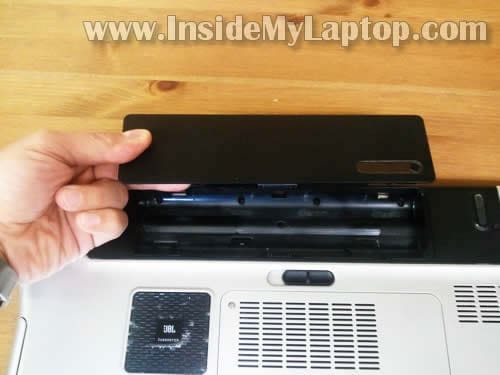
STEP 28- 29: Disconnecting and removing DC jack cable.UPDATE: all disassembly steps should be the same for a Dell XPS L501X laptop.STEP 1.Before you start, make sure the laptop is turned off.Remove the battery.
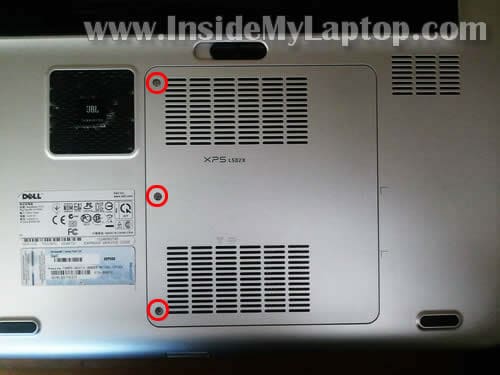
STEP 2.Loosen/remove three screws securing the memory and wireless card cover.Lift up and remove the cover.
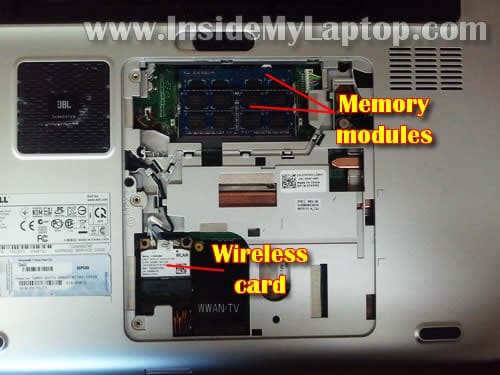
STEP 3.Under the cover you can access both memory modules and wireless card.It’s not necessary to remove memory modules for the purpose of my tutorial. I’ll leave them connected to the motherboard.We’ll disconnect wireless card antenna cables later (step 19) when we remove the display panel.
STEP 4.Remove one screw securing the DVD optical drive.Pull DVD drive from the laptop and remove it.
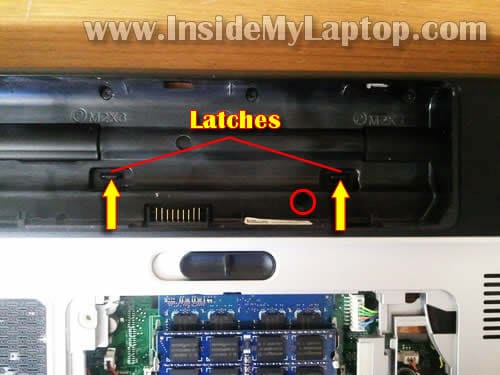
STEP 5.Remove one screw securing the palmrest assembly. This screw located in the battery compartment.Release two latches securing the palmrest assembly.
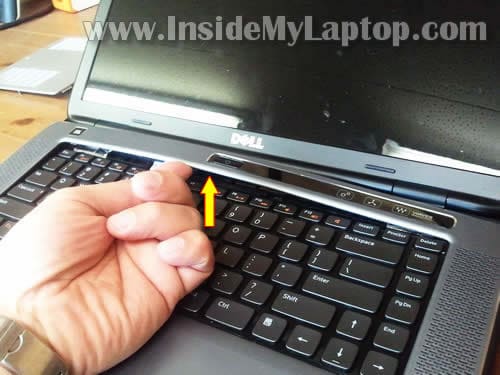
STEP 6.Turn the laptop over and start lifting up the palmrest assembly from the laptop.
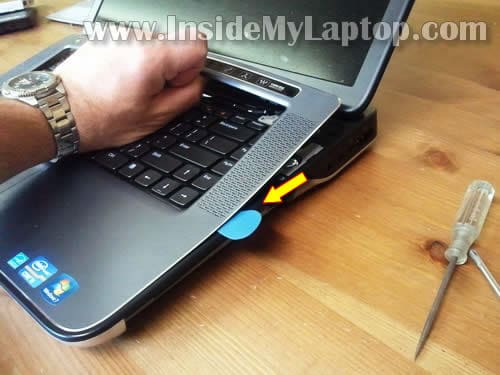
STEP 7.I’m using the guitar pick to separate the palmrest assembly from the laptop base.
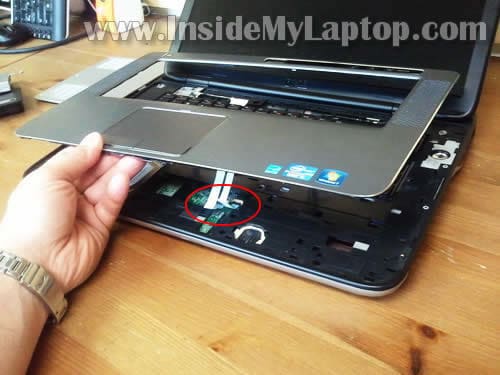
STEP 8.Be careful while removing the palmrest assembly, it’s still connected to the motherboard.
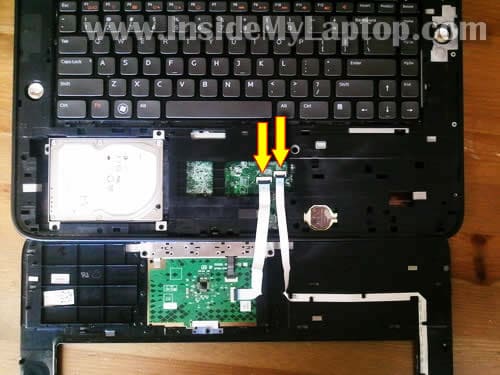
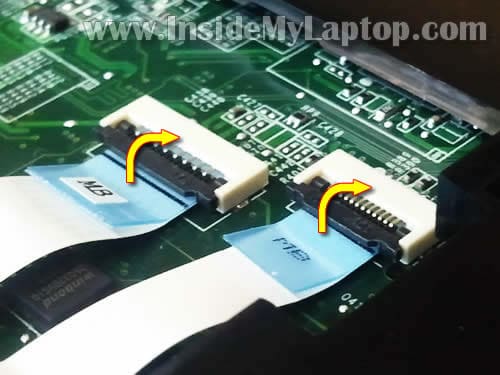
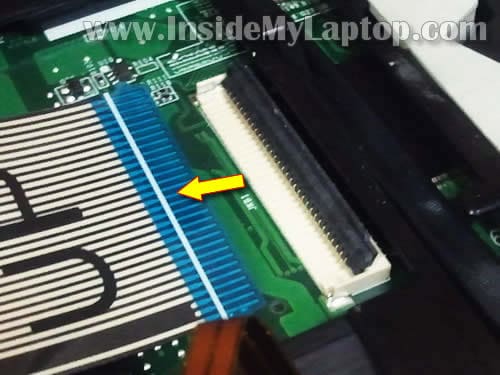
STEP 9.Turn the palmrest upside down so you can access the touch pad cable (left arrow) and power button cable (right arrow).In the following two steps I explain how to unlock connectors and release cables.
Very carefully lift up the left side of the
locking tab with your fingernail. The locking tab will open up at a 90 degree angle.The locking tab must remain attached to the connector base.
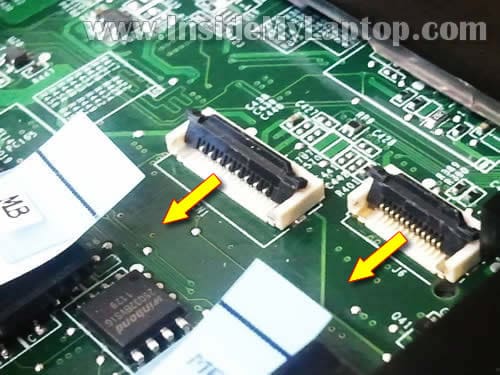
On the following picture both connectors shown in the unlocked position.Now you can pull cables.
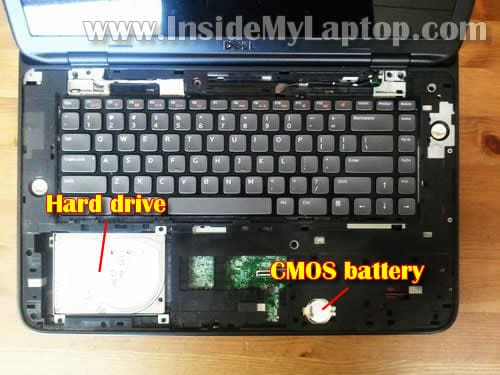
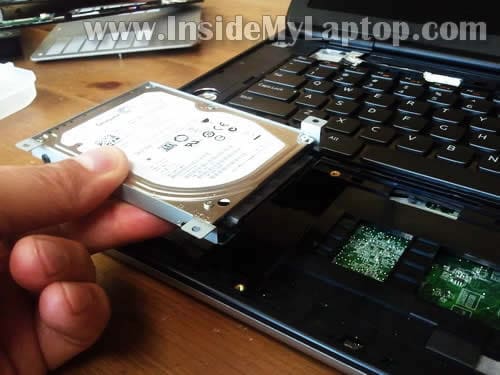
STEP 10.When the palmrest removed you can access the hard drive and CMOS battery.
STEP 11.Remove four screws securing the hard drive mounting bracket to the laptop base.Slide the hard drive assembly to the left to disconnect it from the motherboard.
STEP 12.Lift up and remove the hard drive from the laptop.
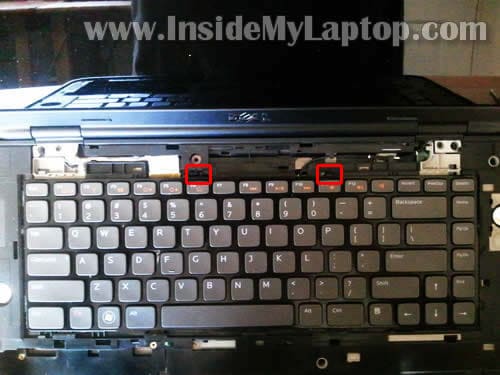
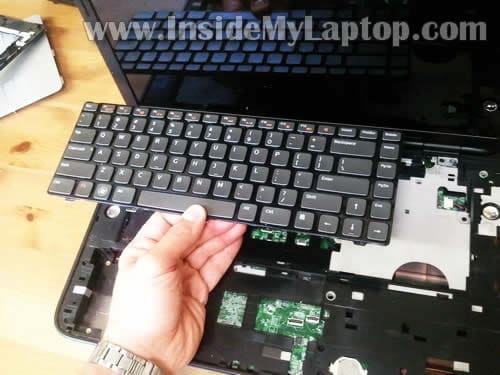
STEP 13.There are two small plastic tabs securing the keyboard on the top.
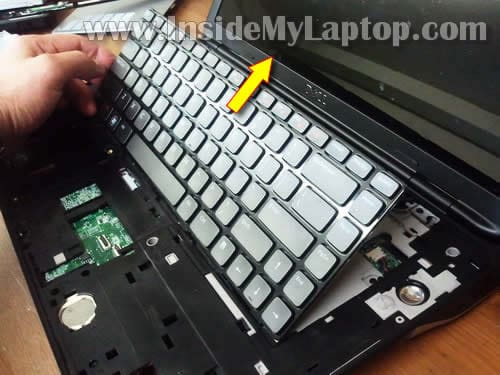
STEP 14.Lift up the upper side of the keyboard and move towards the screen
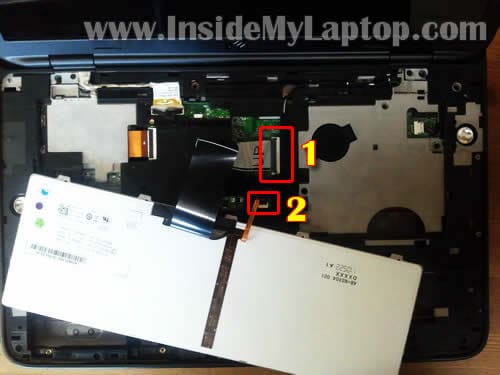
STEP 15.Turn the keyboard upside down.Now you can access the main keyboard cable connector (1) and keyboard backlight cable connector (2).
STEP 16.Disconnect both cables as I explained in the step 9.
STEP 17.Remove keyboard from the laptop.
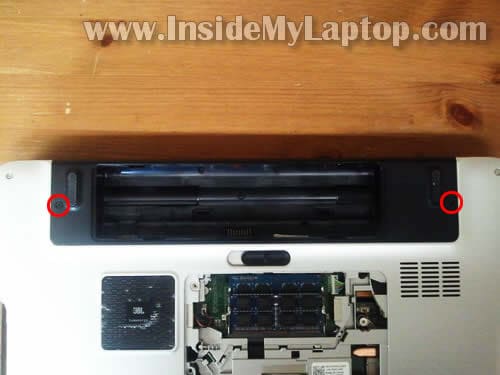
STEP 18.Remove two screws securing display hinges on the bottom of the laptop.
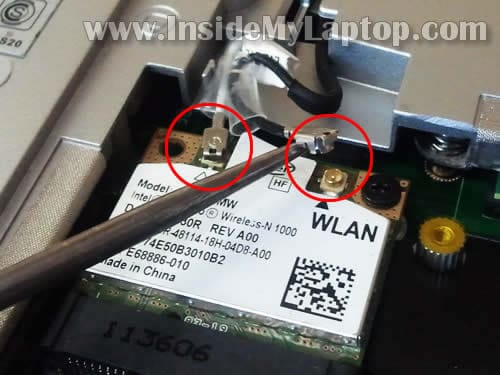
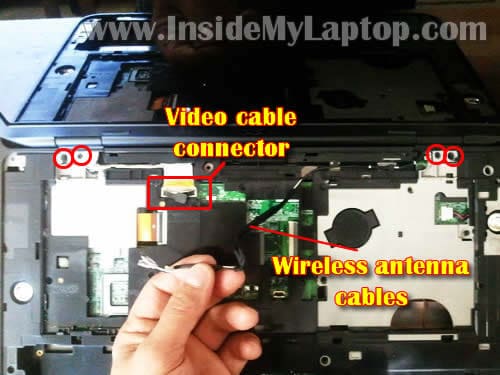
STEP 19.Disconnect white and black antenna cables from the wireless card.
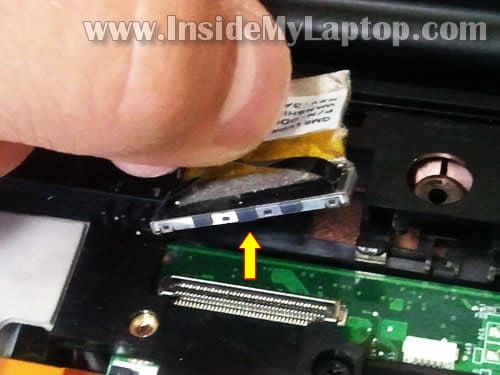
STEP 20.Pull both wireless card antenna cables though the opening.Remove four screws securing display hinges.Disconnect video cable from the motherboard.
Here’s how to disconnect the video cable. Simply pull the connector by the black belt attached to it.
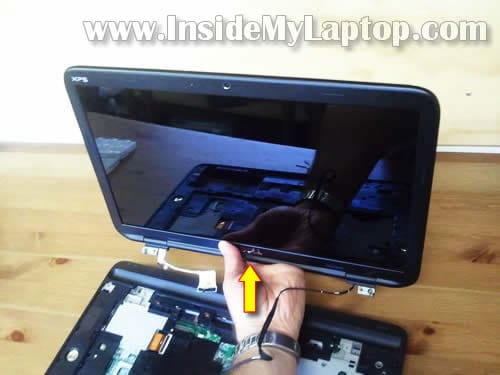
STEP 21.Lift up and remove the display (LCD screen) assembly.
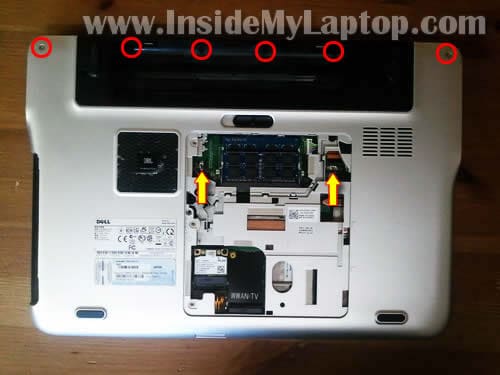
STEP 22.Remove six screws from the bottom of the laptop.Disconnect the subwoofer cable (left arrow) and cooling fan cable (right arrow).
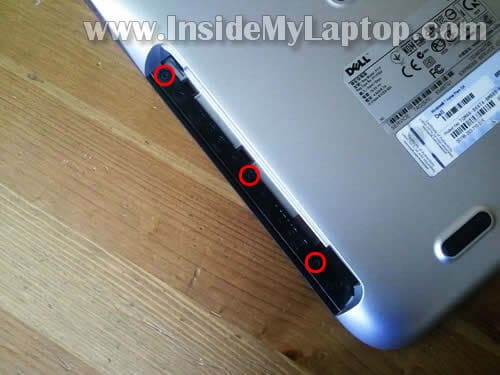
STEP 23.Remove three more screws located in the DVD drive bay.
Here’s how to unplug the subwoofer and fan cable from the motherboard.It’s a regular male-female type connector.
STEP 24.Remove all screws securing the top and bottom covers together.
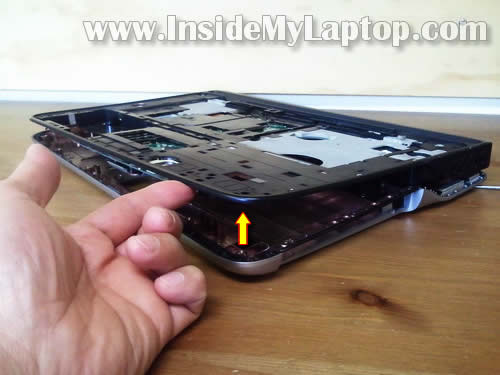
STEP 25.Start separating the top cover assembly from the bottom cover.
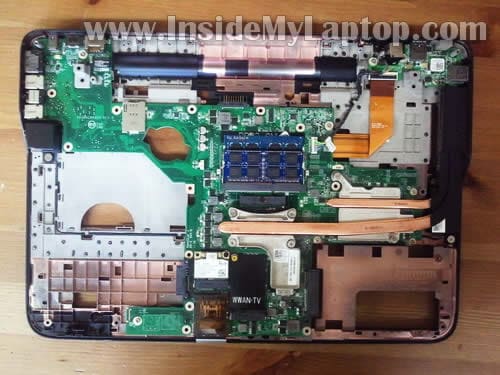
STEP 26.In Dell XPS 15 L502X laptop the motherboard is attached to the top cover assembly.
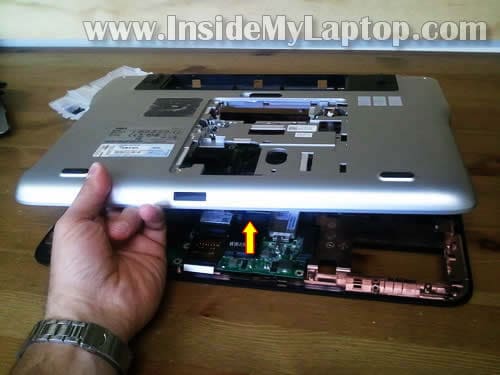
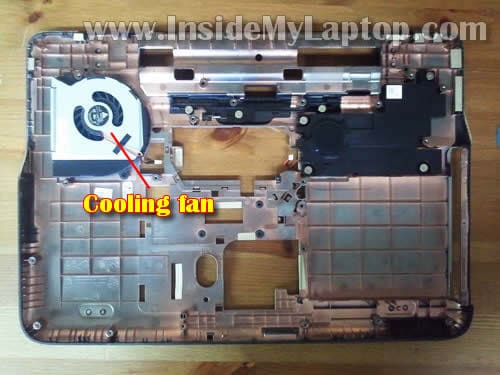
STEP 27.The cooling fan attached to the bottom cover.
Here’s the bottom side of the top cover assembly.As I mentioned before, the motherboard is attached to the top cover.
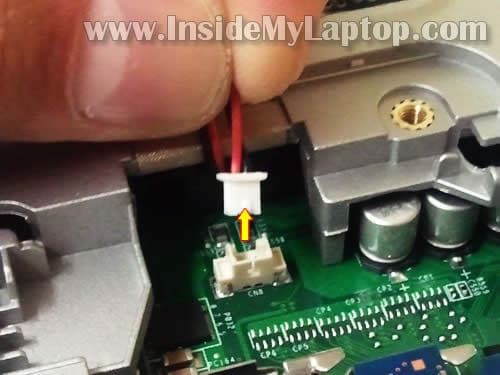
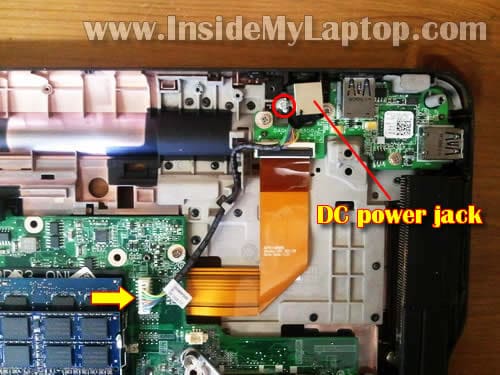
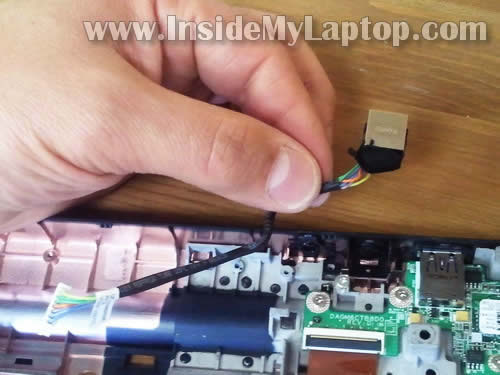
STEP 28.Remove one screw securing the DC jack to the laptop cover.Disconnect DC jack cable from the motherboard.
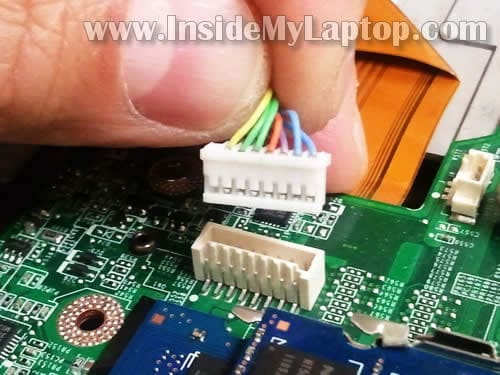
Here’s how to unplug the DC jack cable connector from the motherboard.
STEP 29.Finally lift up and remove the DC jack cable. It’s ready for the replacement.
Last edited by western1; 19-01-2014 at 20:18.
هم اکنون 1 کاربر در حال مشاهده این تاپیک میباشد. (0 کاربر عضو شده و 1 مهمان)
 قوانين ايجاد تاپيک در انجمن

 جواب بصورت نقل قول